Find Your Press-On Nail Size
Measure across the surface of each nail at its widest point and match that number to the size chart below, which lists every size in both millimeters and inches. Millimeters are the working unit — the steps between our closest sizes are half a millimeter apart, finer than an inch ruler can read. If a nail falls between two sizes, size up — a slightly large nail can be filed down at the sidewalls, while one that is too small leaves the natural nail exposed at the edges and lifts early.
The right fit creates a more natural silhouette, a more comfortable feel, and a more secure application. It also does more for how a set wears than either shape or length. Measuring takes about five minutes, and you only need to do it once.
What you need
- A strip of paper, or a flexible measuring tape
- A ruler marked in millimeters, if you are using the paper strip
- Optional: a fine-tip pen and a piece of clear tape
You do not need a special tool. A paper strip and a ruler measure as accurately as anything else, as long as you read the widest point.
If your ruler is marked in inches, use its millimeter edge — most rulers and flexible tapes have one. Fractional inch markings are too coarse for this chart: the smallest common marking, 1/16 in, is 1.6mm, which is wider than the 0.5mm gap between our closest sizes. Measured in sixteenths, #4 and #5 read as the same nail. The decimal inch column in the chart is there for reference, not for measuring.
How to measure your nails, step by step
The video above runs through the whole sequence in about half a minute. In writing:
- Start bare. Remove any polish or a previous set, then clean and dry each nail. Polish adds width and will push you a size up.
- Push the cuticles back gently. This exposes the full nail bed so you measure the whole surface rather than part of it.
- Lay the paper strip flat across the widest part of the nail. That is where the nail bed meets the sidewalls — not the free edge that has grown out past the fingertip.
- Mark both edges. Pinch the tape, or mark the strip on each side with a pen where the nail meets the skin.
- Read it against the ruler in millimeters, to the nearest 0.5mm (0.02 in).
- Repeat for all ten nails. Measure both hands separately. Nail beds are rarely symmetrical, and the thumb and index finger in particular often need different sizes from each other.
- Write the ten numbers down, then match each one to the chart below.
AuriGia size chart
Sizes are numbered from widest to narrowest: #0 is the widest at 16mm (0.63 in), #11 the narrowest at 7mm (0.28 in). The half sizes #8.5 and #10.5 fill the gaps at the narrow end of the range.
| Size | Width (mm) | Width (in) |
|---|---|---|
| #0 | 16mm | 0.63 in |
| #1 | 15mm | 0.59 in |
| #2 | 14mm | 0.55 in |
| #3 | 13mm | 0.51 in |
| #4 | 12.5mm | 0.49 in |
| #5 | 12mm | 0.47 in |
| #6 | 11.5mm | 0.45 in |
| #7 | 11mm | 0.43 in |
| #8 | 10mm | 0.39 in |
| #8.5 | 9.5mm | 0.37 in |
| #9 | 9mm | 0.35 in |
| #10 | 8mm | 0.31 in |
| #10.5 | 7.5mm | 0.30 in |
| #11 | 7mm | 0.28 in |
Match each finger to its own number. Sets that include the full range let you do exactly that, rather than settling for the closest single size across the whole hand.
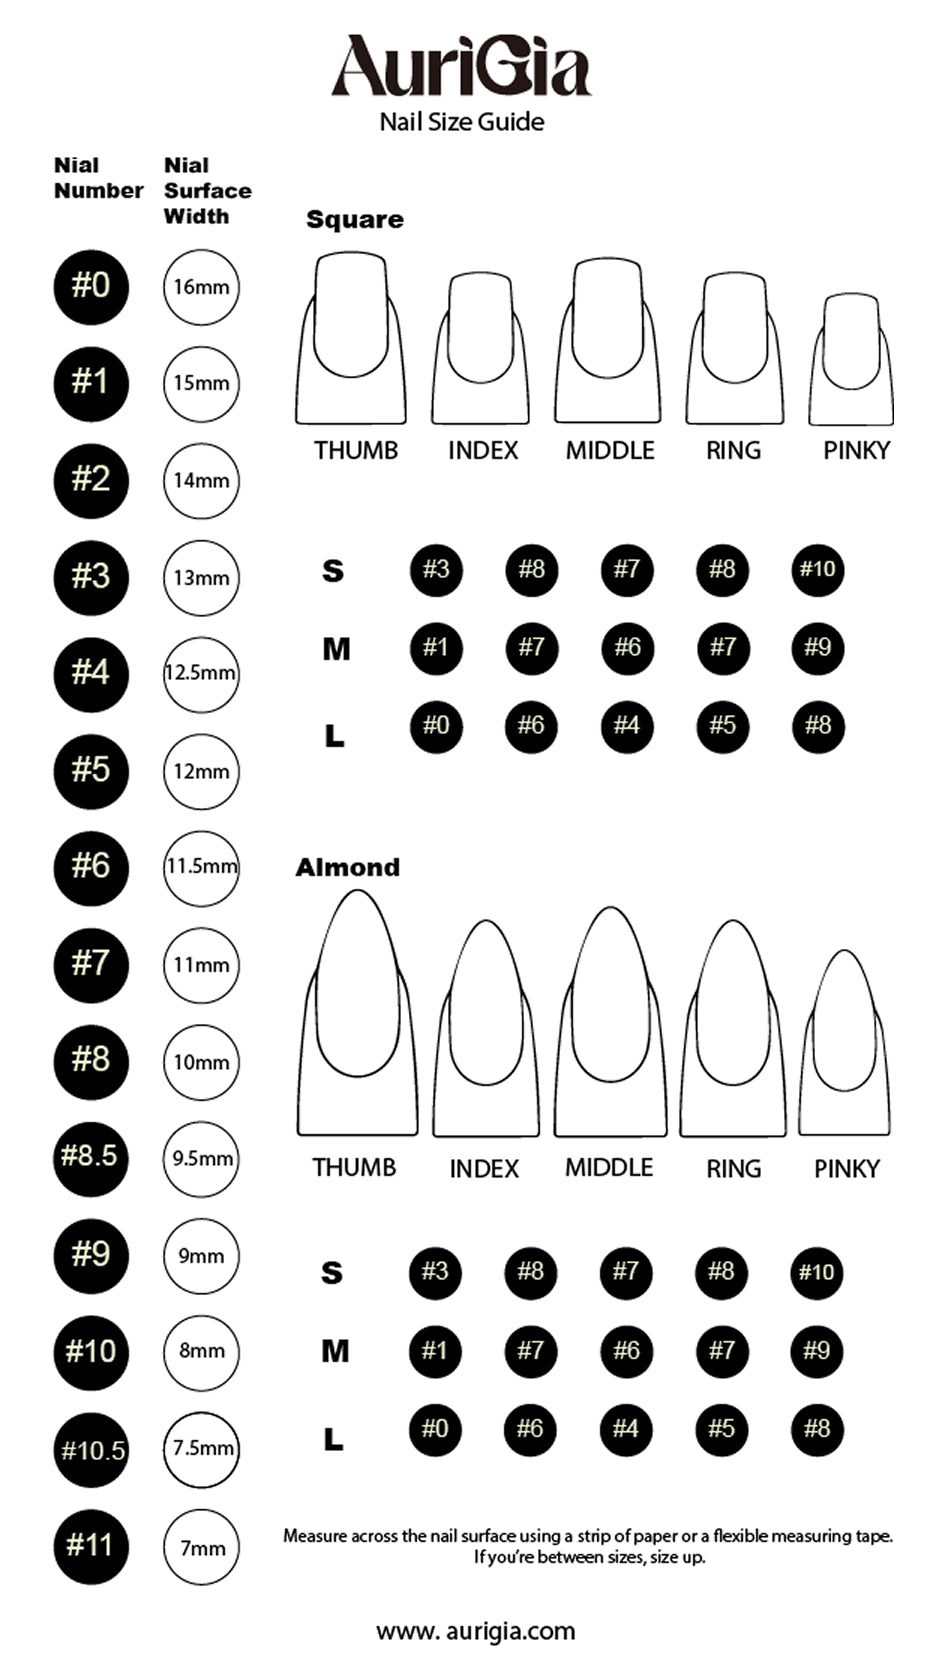
S, M and L: which size for which finger
Some AuriGia styles are sold as S, M or L rather than as a full range. Each preset is a fixed combination of five sizes, one per finger, and the combinations are the same for both our square and almond shapes.
| Preset | Thumb | Index | Middle | Ring | Pinky |
|---|---|---|---|---|---|
| S | #3 (13mm) | #8 (10mm) | #7 (11mm) | #8 (10mm) | #10 (8mm) |
| M | #1 (15mm) | #7 (11mm) | #6 (11.5mm) | #7 (11mm) | #9 (9mm) |
| L | #0 (16mm) | #6 (11.5mm) | #4 (12.5mm) | #5 (12mm) | #8 (10mm) |
Sizes in this table are given in millimeters; the chart above lists the inch equivalent for each number. Compare your ten measurements against these three rows. If most of your fingers sit within half a millimeter of one row, that preset will fit. If your hand splits across two rows — a wide thumb with narrow outer fingers, for instance — choose a style sold in the full size range instead, so each finger can be matched on its own.
The product page tells you which applies to the set you are looking at.
A worked example
Say your left hand measures 15, 11, 11.5, 11, 9 and your right measures 15, 11, 11.5, 10.5, 9. Nine of those ten numbers match the M row exactly. The one that does not is the right ring finger at 10.5mm, which sits between #7 (11mm) and #8 (10mm) — so it rounds up to #7, the same as the M preset already gives you. An M fits.
Now say your thumb measured 16mm instead. That is an L thumb on an otherwise M hand, and no preset covers it. Choose a set sold in the full size range and take #0 for the thumb, #7, #6, #7 and #9 for the rest.
If you are between sizes
Choose the larger size. A slightly larger nail can be filed down at the sidewalls to fit; one that is too small leaves the natural nail exposed at the edges, which shortens wear time and looks less finished.
This is also the safer error to make. A nail filed to fit still seals along the whole sidewall. A nail that is half a millimeter narrow leaves two open seams where water and oil get underneath, and that is where lifting starts.
How a correct fit should look
- The press-on covers the natural nail from sidewall to sidewall with no gap
- It sits just above the cuticle without touching or pressing into it
- There is no lifting at the edges when you press it flat
- It feels secure without pinching
If a nail passes all four, the size is right. If it fails only on width, file the sidewalls before you reach for a different size.
Common sizing mistakes
- Measuring the free edge instead of the nail bed. The tip flares wider than the bed on most nails, so this reads a size or two too large.
- Measuring over polish or an old set. Both add width. Measure bare.
- Measuring the length instead of the width. The chart is nail surface width — across the nail, not along it.
- Measuring one hand and assuming the other matches. Most people differ by at least one size on at least one finger.
- Rounding down when caught between two sizes. Always round up.
- Measuring right after a shower. Skin and cuticles are swollen; wait until your hands are dry and settled.
Shape and length
Shape and length change how the hand reads as much as size does. AuriGia nails are designed to visually elongate the hands, with each size adjusted for comfort and proportion.
Each product page lists its shape and length, so you can match the silhouette to your own nail bed and to how you use your hands day to day. Sizing does not change between our shapes — a #7 is 11mm (0.43 in) whether it is square or almond — so once you know your ten numbers they carry across the collection.
First order: your complimentary Size Kit
First-time customers receive a complimentary Size Kit. Once you upload your measurements, we save your size information and use it to prepare your future orders — so you only need to measure once.
Sizing questions
What if my measurement falls between two numbers?
Size up. A 10.7mm (0.42 in) nail takes the #7 (11mm), not the #8 (10mm).
Are both of my hands the same size?
Usually not. Measure all ten nails rather than measuring one hand and mirroring it.
Can I file a nail down to fit?
Yes, at the sidewalls, with a soft file and light strokes. Filing narrows the nail without changing its shape. This is why sizing up is the safer choice when you are between two numbers.
Do square and almond sets use the same sizes?
Yes. The numbers and the widths are identical across both shapes, and the S, M and L presets use the same five sizes.
My nail beds are wide but short — which measurement matters?
Width. The chart is based on nail surface width, and length is handled by the shape and length listed on each product page.